|
|
Post by Keith Tanaka on Jan 30, 2013 17:42:45 GMT -8
I'm building a '52 Hudson Hornet, Tim Flock version. This is a 1/25 Moebius kit. Tim Flock was a two time NASCAR Grand National Champion. He and his brothers Fonty and Bob dominated the early 50's NASCAR racing while their sister Ethel was the 2nd woman to race in NASCAR history. On July 10, 1949, Ethel Flock Mobley started at Daytona and beat her brothers, Bob and Fonty, to the line. Every time she saw them, after that, she reminded her brothers that they got beat by a girl. She also finished ahead of Herb Thomas, Marshall Teague, Buck Baker and Curtis Turner, all of the top NASCAR racers of that era. The older Flock brothers were whiskey runners prior to NASCAR's beginning in 1949. The Hudson Hornet dominated NASCAR in the early fifties. This 1/25 scale Hudson has a long wheelbase of 5.000". It's slightly wider than the '50 Olds and '51 Chevy I built recently. It will be interesting to see how this long wheelbase car handles. I decided to build this chassis based on the same design as the '51 Chevy I built recently Because of the long wheelbase, I'll probably have a very short guide flag lead (.250" or less). Here's the progress of the chassis build so far: 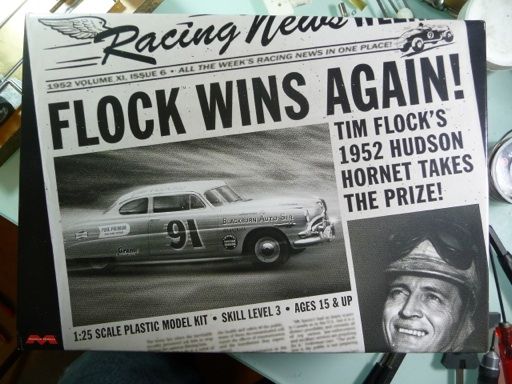 This is the Moebius model kit box art for this model.  Here's what the finished model should look like. If you notice the name on the right side of the car is "Jocko Flocko". Jocko was a Rhesus monkey which rode in Tim's Hudson during 8 NASCAR races. Jocko's NASCAR career ended during the 8th race. In those days, the cars had a small door in the right floor board to check the tire condition since they did not make pit stops unless necessary. Jocko went berserk probably due to debris flying into the car when he opened the door during the race and caused Tim to make a pit stop to unload the wild monkey. Tim ended up 3rd in the race due to Jocko's behavior. It really happened, which is amazing and hilarious. Jocko is the only monkey in NASCAR history to ride in a winning car ('53 Hickory Motor Speedway NASCAR race). 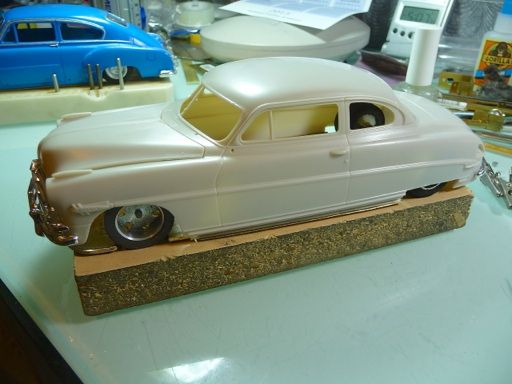 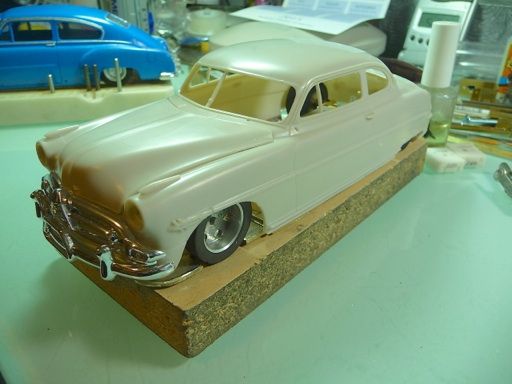 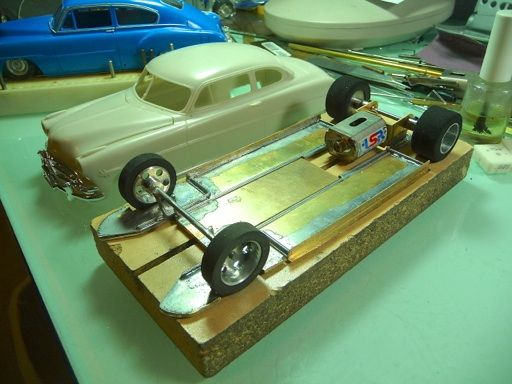 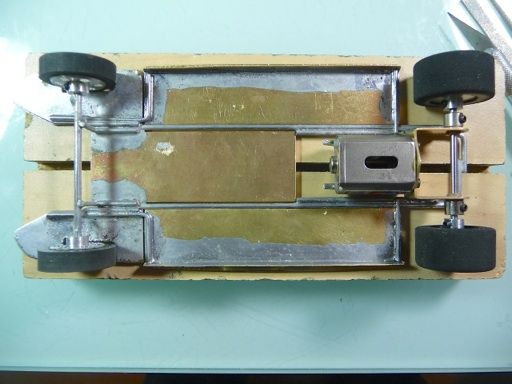 Chassis rails are .078" piano wire. Brass sheet areas are .063". The side pans are a very simple tension plummer design which is easy to build and works quite well on the BPR flat track. Next, I need to add the guide flag tongue, body mounts and side pan crossbar. 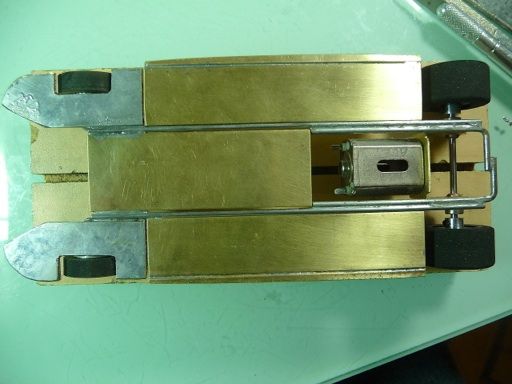 Keith  |
|
|
|
Post by Michael Kale on Jan 30, 2013 19:15:42 GMT -8
Keith: Can you describe step by step how you construct and attach the side pans with the tension plumber design. This is the area I have the most difficulty with in building a chassis.
|
|
rogeru
Junior Member

Posts: 88
|
Post by rogeru on Jan 30, 2013 19:24:05 GMT -8
Wow, Keith, you're really into building cool cars. That's good as it gives me ideas on chassis design and building. It'll be interesting to see how this one handles, being so long. Hope it works out as good as your other cars, except then I'll have even more trouble trying to keep up. Oh well, it's all for fun anyway. Very cool.
|
|
|
|
Post by Keith Tanaka on Jan 30, 2013 21:08:03 GMT -8
Keith: Can you describe step by step how you construct and attach the side pans with the tension plumber design. This is the area I have the most difficulty with in building a chassis. Michael, in the photos below I'll explain how to build the tension plummer movement of the side pans. 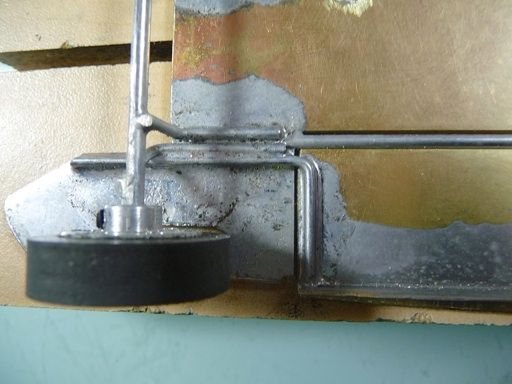 Close-up view of the tension plummer feature shows an "L" shaped .055" piano wire soldered to the front portion of the chassis as well as the side pan. This acts as the "pivot" point of the side pan. Instead of the usual pivoting type front end of the "plummer", the tension plummer allows the rear portion of the side pans to move up and down with built-in tension provided by the piano wire. The .055" piano wire is stiff enough that I didn't need to use an "up stop" as the up movement is limited by the tension of the front "L" piano wire. 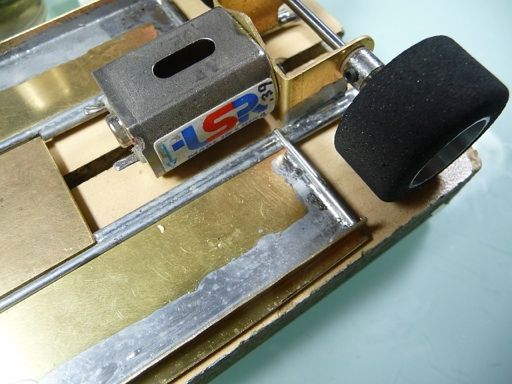 The rear portion of each side pan has a .055" piano wire to act as a "down stop" for each side pan. Note: the TSR D3 motor shown is just a dummy motor I use for building, only the Falcon II or Slick 7 Mini-Brute motor is allowed for this racing class. Update: Beginning January 2014, the TSR D3 and Falcon 7 motors can be used for the '46-'56 Stock Car class (as well as the original Falcon II and Slick 7 Mini Brute motors). 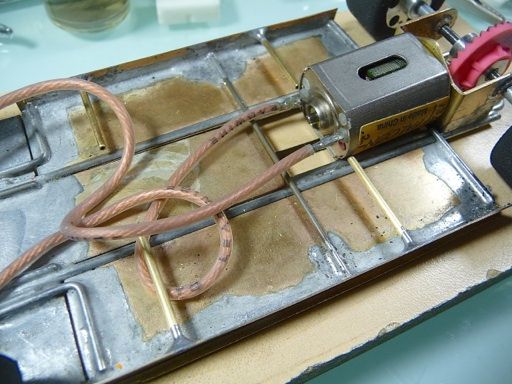 This view of my '51 Chevy chassis shows the same type of tension plummer setup for each side pan. In addition, there's a cross bar piano wire which links both side pans while allowing each pan to move separately from one another. Also, this chassis shows the body mounting brass tubing for each side pan. Keith |
|
|
|
Post by craigg on Jan 30, 2013 22:50:29 GMT -8
Wow: Keith Tanaka--Slot car building machine. This is way cool. My '55 chrysler has a 5" WB also. This will be interesting. I used .047 for my pivots but it proved too flexy, I am now changing to .055, like you told me in the first place. I don't know which I should do first, my '56 Ford or the big Chrysler.
|
|
|
|
Post by Keith Tanaka on Jan 31, 2013 20:16:19 GMT -8
Finished building the chassis. Painting the body is next.  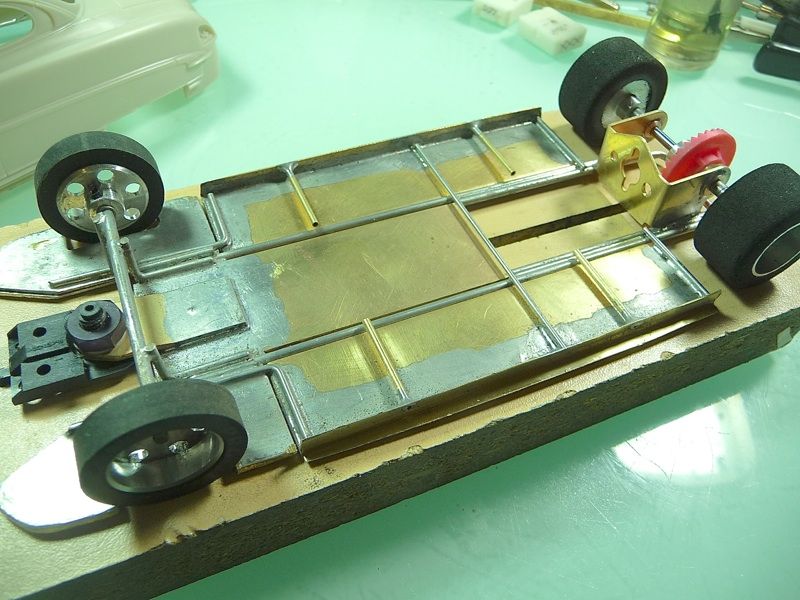 Added guide flag tongue, pin tubing body mounts, side pan crossbar and Slick 7 rear axle bushings. Painting the body will take awhile as the body colors of the Tim Flock Hudson are not common. I'll probably have to mix paint colors to get the right look as well as use an airbrush which I've never done before. This whole process will take time, but hopefully in the end I'll have a car that looks similar to the real race car. Keith |
|
|
|
Post by Keith Tanaka on Feb 7, 2013 16:26:56 GMT -8
I started painting the Hudson today. I could not find the right colors for Tim Flock's '52 Hornet, but decided on two colors. 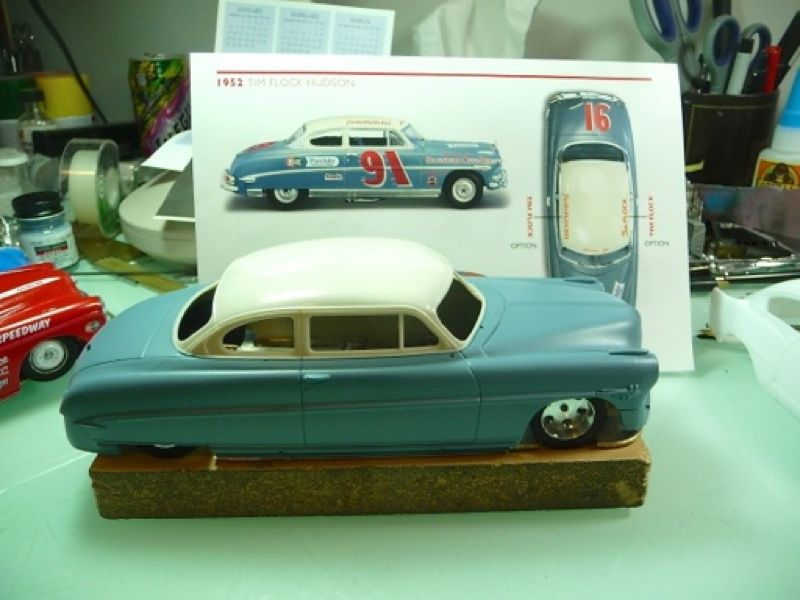 The top is painted Tamiya Racing White (TS-7). It's close in appearance to the real car. The finish came out very good, lots of shine. 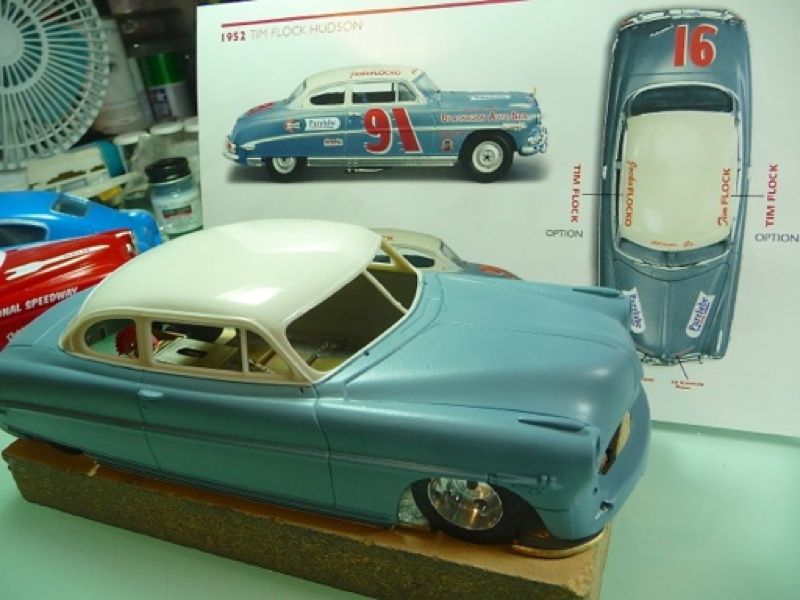 The body is painted Model Master US Navy Blue N-485. The Hudson's Southern Blue color is not available and is a very unusual blue/gray shade. The Model Master color although not the right shade of blue/gray was the closest I could find. I airbrushed the body color and ended up with a lot of orange peel and dull finish. I made the mistake of not warming up the paint prior to airbrushing. I need to learn how to airbrush as the rattle can finish for the top came out much better than the airbrush body. I'll rely on the decals to make the car look better this time but hope to do a better airbrush job next time. I'll add metal foil for the chrome areas next. Keith |
|
|
|
Post by craigg on Feb 7, 2013 17:07:23 GMT -8
Keith-- If you polish out the paint with some 3200 or finer micro mesh sanding cloth you can correct a lot of the problem, then a good gloss coat before and after the decals and it should look good.
Craig
|
|
|
|
Post by Keith Tanaka on Feb 7, 2013 17:57:54 GMT -8
Keith-- If you polish out the paint with some 3200 or finer micro mesh sanding cloth you can correct a lot of the problem, then a good gloss coat before and after the decals and it should look good. Craig Craig, where can I get 3200 or finer micro mesh sanding cloth? |
|
|
|
Post by Michael Kale on Feb 7, 2013 19:18:34 GMT -8
Keith: Altered the chassis on my 56 Chevy to use the piano wire method you detailed. It came out pretty good, but I notice that the chassis has very little play in it. I was under the impression that there had to be movement in the chassis and it now seems pretty rigid. Does the tension in the piano wire give it enough play to handle properly? Can't wait to try it out. It handled badly the way I had it before. Also, where do you get the Stay Clean you use to clean up the chassis?
|
|
|
|
Post by Keith Tanaka on Feb 7, 2013 19:39:58 GMT -8
Keith: Altered the chassis on my 56 Chevy to use the piano wire method you detailed. It came out pretty good, but I notice that the chassis has very little play in it. I was under the impression that there had to be movement in the chassis and it now seems pretty rigid. Does the tension in the piano wire give it enough play to handle properly? Can't wait to try it out. It handled badly the way I had it before. Also, where do you get the Stay Clean you use to clean up the chassis? Michael, the movement of the side pans on my new cars is very limited. The tension of the .055" "L" piano wire doesn't allow much movement, but enough to allow the car to handle smoothly thru the turns. I bought Stay Clean from Amazon. 16 oz. bottle (lasts a lifetime). Keith |
|
|
|
Post by craigg on Feb 7, 2013 19:40:53 GMT -8
I got mine as a kit from Mikro Mark. If you are in a hurry you can use mine and pay me back later. I am going to BPR Sat. morning.
|
|
|
|
Post by Keith Tanaka on Feb 7, 2013 19:49:44 GMT -8
I got mine as a kit from Mikro Mark. If you are in a hurry you can use mine and pay me back later. I am going to BPR Sat. morning. I'll be going to BPR this Sunday to get some parts. I might try out my new Hudson. I'll wait until next week to apply the decals to the Hudson. I believe Saturday there's retro races all day on the flat track. |
|
|
|
Post by Keith Tanaka on Feb 7, 2013 19:53:34 GMT -8
Also, where do you get the Stay Clean you use to clean up the chassis? Michael, I'll be at BPR this Sunday for a few hours in the afternoon. If you're in the area, I can bring my Stay Clean and you can have some. All you need is to buy a small liquid flux dispenser (or two) which they sell at BPR and I can then pour some into these dispensers. It should last you quite awhile. Keith |
|
|
|
Post by Keith Tanaka on Feb 7, 2013 21:59:14 GMT -8
Started adding the metal foil for the chrome trim. 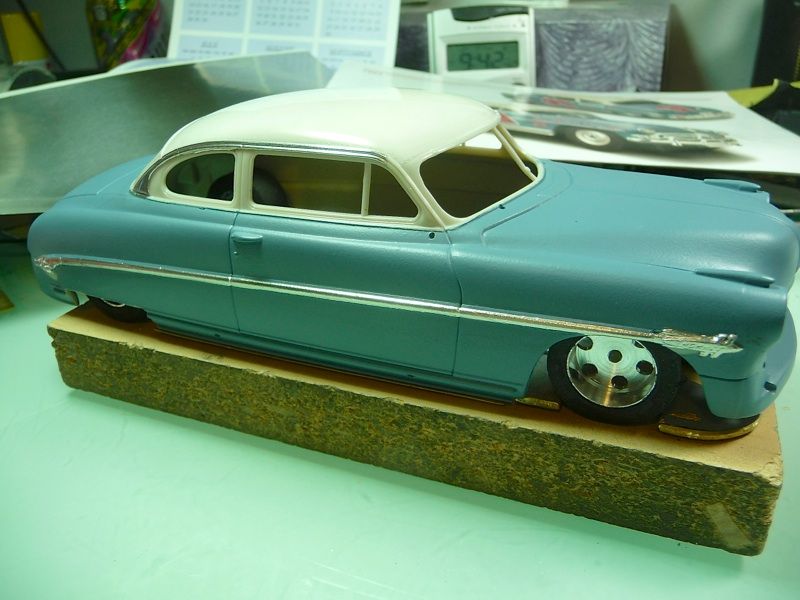  This is the first time I've ever used metal foil. It's easy to apply although time consuming and the end result looks good. Keith |
|


